Sunday, March 31, 2013

Short and Sweet: Two Fab Looks for Short Nails

Do you guys also have the pet peeve of having your nails different lengths from each other? Personally, anything asymmetrical drives me nuts. (Unless it's lopsided in a purposeful way, like the braid I wear over one shoulder, or a diagonal accent color across one side of a nail.)

One of the absolute worst is nails that are different lengths from each other, since it's not just an aesthetic but also a tactile asymmetry. This is one reason why I will pretty much never leave the house without a nail clipper in my bag, just in case some emergency surgery is necessary.

Unfortunately, when moving into a new house, washing a million dishes that have been in storage for six months, and wresting the tops of tons of unruly boxes, nails are prone to breaking.

Oops.

On the bright side, now I have nails short enough to show off some of my favorite understated short-nail looks (and all the dishwashing has made it necessary for me to wear two of them over the course of the last week).

Number one: White. There are many things to love about it:

  • Its a true neutral and goes with anything.
  • It always makes your hands look cleaner (a major reason I like having my nails done).
  • It matches your Easter shoes. (Happy Bunny Day!)
  • It's easy to pull off - not exactly a statement manicure - and yet totally on-trend this spring.
  • It looks pretty good even after washing countless loads of dishes; since it's a light color any chips or imperfections are less noticeable.
Imperfect, but still sexy.

Number two: Purple matte. So right after I last posted about not being sure purple was on-trend, I read a whole bunch of blog posts saying that it is. Yay! I'll soon have an eggplant-colored office, and purple has been one of my go-to shades for a while, so I'm ready to celebrate all the different shades from the richer ones to those reminiscent of the springlike scent of lilac.

Purple! Yay! 
(And even in artificial overhead lighting, 
you can see the reduction in shine.)

I used a new base coat and a new top coat in this manicure. The top coat is designed to dampen the manicure's shine - that is to make it look matte - and the bottle proclaims it as "new," which I think is supposed to mean trendy. I actually loved this look in about 1997. (Especially with black nails; I was a little dramatic as a teenager.) So to me, it's better than new: it's a comeback. From the '90s. So here are my new kids on the (nail polish) block:

The right stuff
Revlon 790 Matte Top Coat
 Revlon 955 Quick Dry Base Coat

What are your favorite short-nail looks? Are there any looks you like on short nails but not on long nails? Or vice-versa? 

Sunday, March 24, 2013

DIY Sugar Nails

If you ask my boyfriend, he'll tell you this happens a lot. One week, I am resisting something new, the next week I am totally experimenting with it, embracing it, and loving it. Go figure.

In this case, it's textured nails. I maintain that having rough-textured nails when you meant to have smooth ones is unpleasant, but after reading that Cathy was willing to try pink sugar nails (since she's a redhead she normally avoids pink), I decided to see if adding texture to my nails would really be that bothersome.

I did not go as far as buying anything new, instead I used glitter that was already part of my makeup collection (Possibly from the 90's? Glitter doesn't go bad, right?) and the Rimmel London polish and topcoat I tried for the first time last week. (Although obviously I did not use it as a base again.)


Sugar and spice and everything nice.


The steps are fairly easy. What I did was:

1) Paint all ten nails with a satisfactory amount of polish. I used three coats of the purple to get the color saturation as I wanted.

2) Let nails dry as normal. I wouldn't have tied my shoes or done some other smudge-prone activity, but I let my nails dry around half an hour and was fine to type and open the glitter bottle and stuff.


Products used: Rimmel London 370 "Wild Orchid" and Lancome Glitter in "Hologramme"

3) Apply glitter to each nail. I tapped a pinch of glitter on to one index finger, and tapped it again onto each nail of the opposite hand. Then I repeated the process with the other hand, and kept doing so (slightly obsessively) until there was an even amount of glitter on each nail. As you can see from the picture, the glitter gets places you don't necessarily want it, but it's easy enough to brush off (or remove with a lint brush or scotch tape if you want).

4) Apply topcoat. Pretty straightforward. Two things to keep in mind are: Topcoat makes the bottom coats vulnerable to smudging and smearing and a little bit of the glitter will get stuck in the topcoat brush. In fact, though, I was pleasantly surprised about how little this happened. It was really easy to wipe the brush on a piece of paper a couple of times and get it clean again.

This is a pretty easy and on-trend DIY look. I will report back with any developments, such as the gitter or polish coming off unexpectedly, as happened last week. (You can see the bottle claims it lasts ten days!)

Friday, March 22, 2013

Wear and Tear

Since I was so excited to use my new Rimmel London base/topcoat, I figure I should post an update on the results, which, sadly, were a little disappointing.

One problem -- which actually happens to me a lot when layering nail polish so it might not be the topcoat's fault -- is that adding another wet layer makes the dry layers underneath vulnerable to smudging and smearing again.

What happened this time, which seemed to be unique to the topcoat's interaction with the Covergirl gold polish I used, was the formation of tiny bubbles on the surface of the nails. This kind of thing is not  really noticeable to others but drives me crazy! I love having the surface of my nails feel smooth.


I'm not sure if you can see the bubbles in the gold, but you can definitely see the chipping!

Another problem is the chipping. The whole point of using a topcoat is so that I can go through a whole week (hence the name of the blog) without devising and implementing another manicure. I think that last week's green-on-green held a lot better - without topcoat!

So, I've asked this before but I'm still curious - What are your favorite topcoats? Did I get bad results because I was using a cheap one? How do you apply your topcoats? I ended up putting a layer between each of the polish colors, so maybe that is the problem. Let me know how you do it and what kind of results you get!

EDIT: (a couple of hours later)

Now I am super convinced this Rimmel base/topcoat should not be used as a base. I took a bath and this was the result:


Talk about a different way to remove nail polish!

All of the polish pealed off, easily and, as you can see, in astonishingly large pieces. This has never happened to me before, ever, so I can offer no explanation except to blame the base coat. I'll try to pick up a different one soon and try it out. Several people have suggested OPI, so I might try that, depending on the price. 


You can also see my naked nails, my new green bathroom, and my signature pink robe.

Normally I would include a shot of the products I used to achieve a certain look, so here is the shampoo I used in the bath. Also some bar soap, which did not photograph particularly nicely.

The upside is I now have naked nails without the yucky nail polish remover smell.

Sunday, March 17, 2013

Trendblending

I've already posted about nailscapes of mine that have seized on the trend of gold polish. One of my favorite trends this season is actually opaque white nails but I have not done a post on these yet because my nails are a little bit longer than ideal for this look right now and also because I've been feeling too creative to leave things be at plain white lately.


Colors!

To be honest, I am not sure that purple is really all that trendy this season. I do know that I went to a party last weekend and my two favorite manicures there were different shades of this regal color. Since I'd also been on the lookout for a base coat, I was delighted that Rimmel London had a two-for pack of a multi-tasking base/top coat and a pastel purple. Pastels are in this season but this purple actually turned out to be a little darker than I'd expected so it's hard to say whether I've really hit the mark with that one.

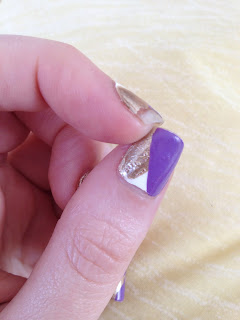
As usual when I get creative, I started off with something fun and could not leave well enough alone. Here is how my nails looked after applying the first two colors, which actually amounted to a base coat, two white coats, two diagonal gold coats, and a top coat.


Can't seem to get enough of this color combination.

Diagonal designs are another trend I've been grooving on but haven't put into action until today! As happened last week as well, I've found I am a little too perfectionist about this to love the results, but it seems easy enough that with some practice it will be fine. I probably had much worse results the first time I french manicured myself, which I'd guess was in about 1997.

I wore this gold-on-white mani out to get a bagel for lunch and that went well and everything, but then when I got home I decided to add some more color. I've been digging the idea of layering nail polishes lately, and since I just moved into my new house this week (!!) I have not yet unpacked significantly enough to know where the scotch tape is, which seems to be a necessary tool to create a more structured look. (I am also looking forward to finding the rest of my nail polish collection!). For now I decided to freehand another diagonal and this was the result:


The finished product

I like it because I think the color combination is good - springlike, even though it is still below freezing here and may even snow later in the week - and because in addition to exhibiting my blossoming diagonal-painting skills, it creates a pointed version of the pronounced nail moon which has also been trending this season.

Monday, March 11, 2013

Experimenting with Emerald

Sometimes you just have an off day. Working all day but not getting anything done, arguing with loved ones over a misunderstood sentence or a petty detail, messing up the execution of a very cute manicure idea and getting nail polish all over the place. That was me yesterday.


It's not often I grab a wet nail in utter frustration, but it doesn't never happen.

One theme for this blog is certainly my relationships with trends. Some trends, like metalics, I embrace and love right away. Others, like gel manicures, I am pretty sure I'll never be on board with. Yet another class of trends are those that right now there is part of me that cannot imagine being into but another part knows that I am stubborn at first but easily persuaded over time so maybe I will be eventually. (Did that even make any sense?) Almond-shaped nails are in this category.

Emerald as the color of 2013 is a trend that I don't love but that I can live with and, if I'm honest, it's fun to be creative with something I feel unenthusiastic about and turn it into something I feel ownership over and happy about.

So yesterday I gave myself a messy but serviceable emerald/teal french manicure. Most of my nails are teal with an emerald tip and three are solid emerald, two because I decided emerald with a teal tip wasn't doing it for me, and the third because I just kept messing up the tip so I decided to make the whole thing emerald. (Actually this was a case of having the tip almost perfect and ruining it by trying to make it a little better. Arg.)


The final result, with Color Club's Wild Cactus and
 Age of Aquarius clutched in my frustrated little claws.

Despite my frustration with applying the nail polish, getting it all over my hands and even on my clothing (luckily my Sunday sweatpants are already green-on-green, so it's not too noticeable), and getting textured imprints on almost-but-not-quite perfectly dry nails, I really like how successful this manicure was at turning me around on emerald. It looks chic and not at all Christmasy on the nails where it is solid, making me think having most of my nails be solid emerald with a few accent nails would also not have the side effect of "O Tannenbaum" getting stuck in my head.


Green sweatpants in the background. Would you have gone back and tried to correct
 the tip of the middle finger or just left it be?

Thursday, March 7, 2013

BlogLovin'

Follow my blog with Bloglovin

Let's see how this whole connecting to people via the internet thing works out for me!

A Better Way to Remove Nail Polish

Usually I leave my nail polish on until it is so cracked and chipped I just can't take it anymore and want to remove it as fast as possible! Recently, though, I've been reading about how using nail polish remover in a wiping, rubbing - or, worse, scrubbing - motion is pretty bad for your nails and therefore not the recommended way to get the job done. I can corroborate this - my nails are usually pretty strong, but I have notice weird peeling of the top layers after particularly vigorous polish removal. So I decided to try a different way.

I read somewhere - probably in a magazine (kind of a throw-back but I love to read magazines in the bath and other non-iPad appropriate places) -  that the best thing to do is wet a cotton ball with nail polish remover, place it on your nail and wrap a thin strip of aluminium foil around it, let it sit for ten or so minutes, and then remove the foil and cotton balls - and of course all the polish with them.

I've already written about my resistance to following directions when it comes to my digits, so obviously I did not do just that. Here is what I did do:

i. Materials:

one cotton pad, cut into six even pieces
rubber bands*
nail polish remover

ii. Procedure:

1. Wet five pieces of the cotton pad with nail polish remover.
2a. Place each of the pieces on the nails on one hand.
2a. Secure with a rubber band. (So, right after I did this, I realized that securing something to your finger tips with a rubber band hurts! So I pretty much took them off right away - of course I took pictures first, though. *If you choose to follow this method, you probably want to leave the rubber bands out. Since the pads were wet and nail polish remover kind of sticks to nail polish, they stayed on well even with nothing holding them in place.)


Do not do this. It hurts.

3. Wait the length of an Icona Pop song.
4. Remove cotton pads (and most of the polish!).

Something that I like about this procedure is that you use way fewer cotton pads this way! Whereas before I'd usually use at least one pad per hand, now I could just...

5. Place each of the pieces of cotton on the nails of the other hand, opposite side facing the nail as previously was.
6. Repeat steps 3 and 4.


This is the "reuse" step in reduce-reuse-recycle.

One Icona Pop song is actually not long enough to remove all of the polish, so what I did was...

7. Use the sixth pad and some of the unused corners of the other five for cleaning up any lingering polish.


Results of the experiment.

iii. Findings:

This method takes a bit more patience, but it feels a lot better on my nails than the (sc)rubbing method.
Next time, I will definitely not use rubber bands.
Next time, I will try to wait the length of two Icona Pop songs per hand.

All in all, I was pleased with the experiment! I will definitely be using this method again.

Do you guys all already do this? Am I behind the curve and/or unusually impatient about removing nail polish?

Sunday, March 3, 2013

Going for the Gold

I've seen metallics, especially metallic patterns around a lot lately - gold used instead of the classic white for the tip of a french manicure, stick-on metallic patterns not only advertised by Kim Kardashian but also now apparently being sold by the likes of Essie, and also those polishes that are actually made out of metal* and come with a magnet to help users create unique patterns in the pigments on their nails.

I saw Cathy try out the whole magnetic nail design thing and, honestly, it seemed too complicated to me. Wait 'til your nails are damp: not 100% dry, but not wet; hold the magnet close to the nails, but obviously don't touch the nails with the magnet; hold it there for (what seems like) a pretty long time, without moving, etc. I don't enjoy following so many rules when I'm being creative with my nails.

On the other hand, something that I do enjoy is coupons. I recently had one for a couple of bucks off a Covergirl nail polish and I picked up number 230, Golden Opportunity, and used it to create the two mainis below.


Golden moons on an opaque white background.


Thick golden stripes on a charcoal background. I was sort of going for a "picture frame" look, 
but I drew the frame first and then painted the picture on top. Also I like the "frame" much better when it's just on the sides, to use optical illusion to elongate the nail, not make it seem weird and square and stubby.


I love the way this polish layers, giving me a way to create different looks based on how many coats I use and how thick each coat is. Even though (or maybe because?) I can be a perfectionist about symmetry and making sure my hands match each other, I find it easier to freehand like this than to use a tool like the magnet polish to introduce patterns onto my nails.

I have not tried the stick-on patters yet (although I did buy some for Kendra because the USPS does not let you mail packages containing nail polish), mostly because I like to do things on the cheap and they seem pretty expensive to me. So even Essie adding a line probably won't change my mind on this issue.

Below is a picture of the polishes I used in these pictures, in case you are interested. Also I realize I am in need of a good top coat and also maybe a good base coat, because I do a lot of things like dishes (okay maybe not a lot, but enough) and showering that mess up my nailscapes. Any suggestions, friends?


Sinful Colors 101: Snow Me White - Covergirl 230: Golden Opportunity - Color Club 968: Status Update

Edit: Twins! Olga was doing golden cuticles over super-trendy cactus green at the same time I was doing my faux picture frames yesterday. Here's a shot of her nails:


Yay! Maybe I will try a green and gold mani sometime soon.

*I did not research this statement. Please correct me if I'm wrong about how magnets work.